

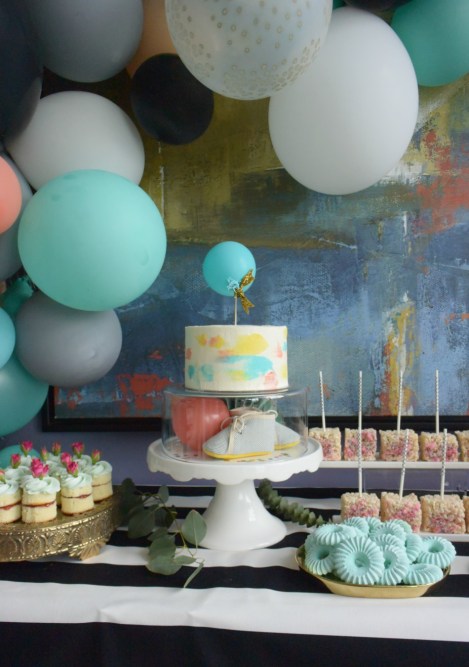
The first item on my ‘to-bake’ dessert list was cake. As cake could be baked in advanced and frozen, I did all my cake bake prep first so that come pre-party day I could focus on the cake decorating. Efficiency was the name of the game and aside from strategically planning a baking timeline, to get the most visual impact for my efforts and to minimize waste from left-over cake, instead of baking a large cake I opted for mini cakes.

To pull of a multi-tiered cake effect, I baked a cake topper and instead of stacking it on a dummy styrofoam tier [that would still require time to decorate], I created a tier from a glass vase. I now only needed to concern myself with baking and decorating a 6.5″ small cake and finding items to fill the vase layer. This magical glass layer cut my baking + decorating down by more than half the time it normally would have taken to pull off 2 decorated and stacked cake tiers.

For the bottom tier, I was initially on the hunt for an acrylic cylinder. My search proved unsuccessful as the options I found would either have arrived late or cost me $$$. So, I turned to the tried and cost-effectively true, Ikea, and came across a set of 3 cylinder glass vases [$14.99] in which 1 of the 3 was a size I could work with.
 Using the shortest/widest vase [3″high x 9″diameter], I flipped it upside down on a cake stand and filled it with fun baby related objects -a bright mini balloon + Atlas’ cute Hermés booties + confetti + 1/2 a decorative paper fan.
Vanilla Sponge Cake Recipe –> Gretchen’s Bakery
Icing Recipe –> Ron’s Swiss Meringue Buttercream
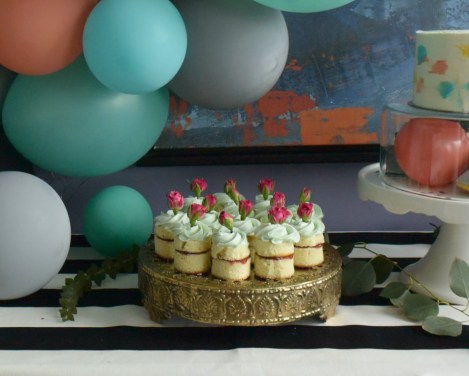 In addition to my cake topper, these little individual cakes were also quite simple to make and turned out so pretty. I used the same vanilla sponge cake and swiss meringue buttercream recipes as detailed in the above links.
To construct these minis you will also need…
- 1 3/4″ diameter round cutter
- jam [I used a Fortnum & Mason strawberry preserve]
- small rose buds
- floral tape
-To prep the roses, trim stems to no longer then 1″ in length and wrap with floral tape
-Once the cake is baked and cooled [or thawed if starting from frozen], cut out rounds and slice in half [assuming you are starting with a cake about 2″ in depth]
-Lightly brush simple syrup on each halved round
-Spread about a teaspoon of filling on half the rounds and sandwich together
-To decorate, with a star tip, pipe buttercream inward out in a circular motion creating a rose pattern
-poke a rosebud into the centre of each mini cake
-plate and serve!
I think I successfully achieved the cake aesthetic I was going for in half the time and effort. Baking and decorating only took me about 2.5 Atlas sleep sessions! You can definitely expect to see this “2-tier” cake again at our next party!
This could be my new fave baking #momlife short cut; watch out future school bake sales [wait, are those still a thing?] -here I come!

